The Project
After years of using a traditional WordPress site for jumpoff.io, when it came time for a redesign of JumpOff’s own site, I decided not just to build a new theme. I wanted to provide a better browsing experience by incorporating more modern web development technologies while still using WordPress to manage my content. What I ended up with is a Netlify hosted React web app fetching data from a WordPress install via GraphQL.
Here were my primary goals in the website redesign:
- Faster load times
- Smoother page transitions
- Better code deployment process
- Keep my blog content in a WordPress install
- Cleaner, updated look (of course)
Why Not Just Create a New WordPress Theme?
While a traditional WordPress setup has a lot of strengths (and I still think it’s a great choice for many situations), it has some major downsides as well. One of the biggest downsides is that the application code runs on the web server, so every time a user navigates to another link on the site, it requires an entirely new HTTP request to the server, that request is processed, and a whole new document is sent back to the browser. This results in a lot of data being sent back and forth, when often, we already have a lot of that data loaded in our browser. If we’re looking at one blog post and we navigate to another, do we really need to send a new header, footer, stylesheets, etc.? Why can’t we just update our route and request the content that is actually different?
Client Side JavaScript Apps to The Rescue
In recent years, client-side JavaScript applications (like React, Vue, Angular and Ember) have solved that problem. By allowing our application code to run in the browser itself, we can navigate to a new page without a full page refresh. If we need to get new content, we navigate our new route almost instantly, and make a request to an API for our new content if we need it. This means much faster page loads. It also means we can control how the page transitions. Instead of a jerky white screen popping up for a bit while our browser processes the request, we can fade, slide, show a loading animation, or even a star wipe!
The majority of the work for the rebuild went into the React Application, which is available on Github.
Headless WordPress as a CMS
So if we have our client side application, we still need somewhere to manage and store our site’s content. The addition of the WordPress REST API made this possible by exposing WordPress content to other applications. I’ve used the REST API for other projects, but recently, another option has become available. A plugin called WPGraphQL allows us to quickly get data from our site using the GraphQL query language, which allows to ask out site for exactly the data we need, as opposed to a traditional REST API endpoint where we get everything that comes back from that endpoint, and we may need to make multiple round trips to get all the data we need. Using WPGraphQL will also allow us to use Apollo GraphQL in our client application, which has many cool features we can take advantage of later.
Since our site uses custom post types (in fact, this very page IS a custom post type), we need to create a plugin of our own that extends WPGraphQL to allow queries to our custom post type. Using WPGraphQL and our own custom code, we can quickly and efficiently get and send all the data we need back and forth from our client side app and our WordPress CMS. One of the benefits of this approach, is what we can continue to manage content through WordPress’ familiar backend, and utilize its user management tools.
Going “Serverless” With Netlify
Originally, the JumpOff WordPress install (now at https://api.jumpoff.io) and our web application server (https://jumpoff.io) were both running on the same VPS. There was an Apache web server serving the WordPress site, and a proxy routing the web application requests to a NodeJS server running on the same VPS. The NodeJS server would serve up a server-side rendered React application, which means upon a request, the node server would full render the React app markup, and serve that to the browser, so the page is served rendered, rather than serving up the app, and letting the browser render the app. This is often done for the sake of SEO, though the major search engines can reportedly crawl client-side applications just fine.
Along came Netlify, which offers really fast “serverless” hosting (which is probably more accurately called build-time rendering). The idea behind Netlify is that you can dispense with all the headache of managing a server, and use their service to just serve up static sites very quickly, as your (static) site won’t be running code on their server every time a request is made. They just serve the files up and do it quickly. And since serving up a React application (without server-side rendering) is basically just serving up a static site (HTML/JS/CSS files), I realized I could use Netlify to host jumpoff.io (for free), reducing my server load, improving my site delivery time and making my deployment process much smoother (one push to my GitHub repo and my new code is deployed). This did require removing the server-side rendering for my app, but by utilizing the Helmet package for React, and generating sitemaps for jumpoff.io, we won’t have to sacrifice SEO.
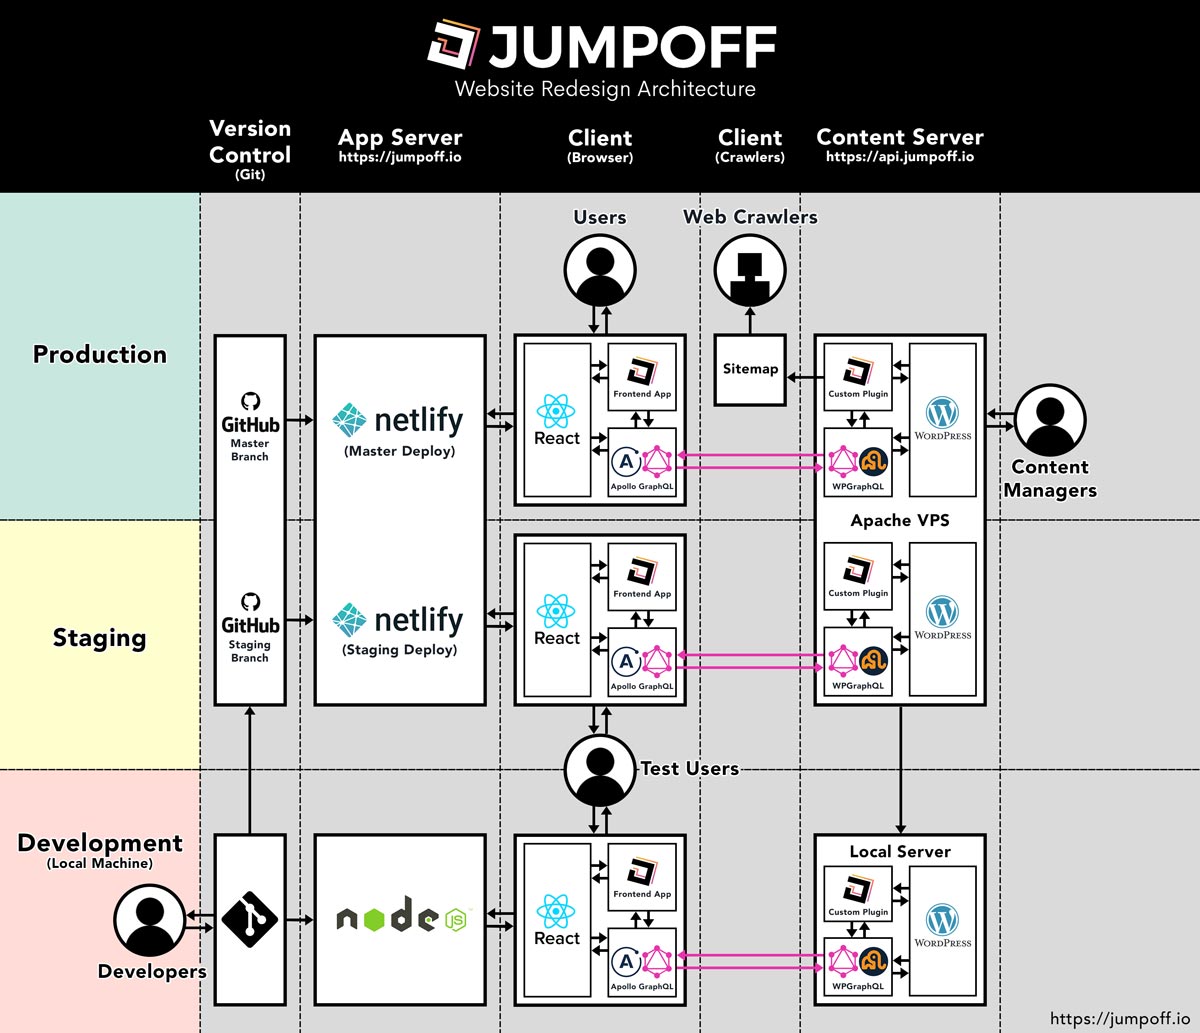
New Website Architecture Diagram
This diagram shows how the jumpoff.io site is configured. This configuration could be used for lots of sites, including existing WordPress sites who are looking to improve and leverage the power of frontend JavaScript frameworks while still allowing their content managers to use the familiar WordPress backend to manage their content.
Mission Accomplished
So yes, it’s true there are more moving parts now. But once I got everything configured, the user experience, load times, developer maintenance, and versatility of the site have all been improved, and I’ve reduced the load on my VPS. Plus I can still manage all my content via the WordPress admin that I’ve always used.